Intercom rings but the door won't open: how to diagnose the release circuit
Published 8/31/2026
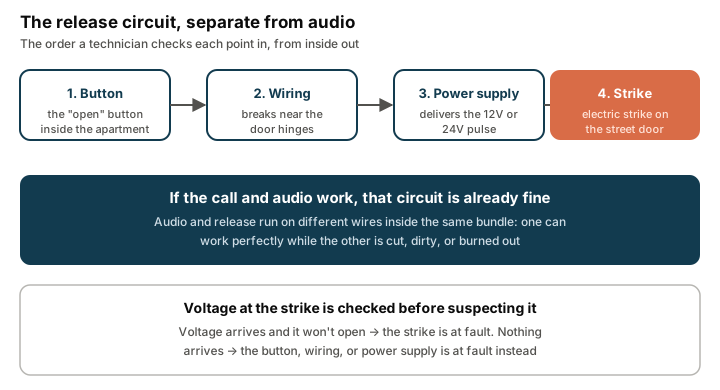
If you press the open button and hear a click, or nothing at all, but the street door stays locked, the problem isn’t the communication — that already worked, since you heard the visitor and they heard you. What’s failing is a completely separate circuit, the release circuit, and that changes the whole diagnosis.
This article assumes you’ve already narrowed it down to that case. If you’re not sure yet which fault you have, start with my intercom isn’t working, which covers the five typical categories and points you here when it’s the right one.
Why does the intercom ring and let you talk, but the lock won’t release?
Because an electric intercom is really two systems sharing one panel, not one. The first carries audio (and video, if there’s a camera) between the street and your apartment. The second is a low-current circuit that starts at your “open” button, runs down through the building’s wiring, passes through a power supply, and ends at the electric strike on the street door. They’re physically different wires inside the same bundle, and it’s common for one to work perfectly while the other is cut, dirty, or burned out.
The fact that the call works confirms the street panel, your indoor handset, and the main power supply are all alive. That already rules out a good chunk of possible causes and narrows the search to four suspects: the release button, the wiring for that specific circuit, its power supply, and the strike itself.
What actually opens the door?
The part doing the work is called an electric strike (in Spanish, chapa eléctrica or cerradura eléctrica — colloquially the “abrepuertas”) and it’s worth understanding how it works before suspecting it. It isn’t a bolt held shut by continuous electricity — that’s a magnetic lock, used for a different kind of access control. An intercom’s electric strike works the opposite way: it’s normally held shut by a mechanical spring, and a momentary electrical pulse releases the latch so the door can be pushed open. Without that pulse, it stays locked; during a power outage it also stays locked, unless the building’s system has a battery backup.
That “pulse, not continuous current” logic is exactly why the fault almost never turns out to be “it ran out of power”: it’s that the pulse isn’t reaching the strike, or it reaches it and the mechanical part doesn’t respond.
What order does a technician check things in?
Inside out, following the path of the pulse, not the other way around:
- The release button. Checked first because it’s the simplest and cheapest part to replace. A button worn down by daily use sometimes doesn’t make good contact even though it feels like it’s pressing fine.
- Voltage at the strike. With a multimeter, check whether pressing the button delivers voltage to the strike’s terminals (typically 12V or 24V, depending on the model). If voltage arrives and the door still doesn’t open, the fault is in the strike. If nothing arrives, the fault is upstream: the wiring or the power supply.
- The wiring for that run. The cables between the panel and the strike tend to break at one specific spot: where the door frame meets the door itself, near the hinges, because that’s where the cable flexes every time the door opens and closes. Over years, the copper fatigues the same way any metal does after thousands of bends.
- The strike itself. If voltage reaches it and it still doesn’t respond, it’s usually a lack of lubrication in the mechanical part (it can be taken apart, cleaned, and lubricated) or worn-out moving parts that are past repair, in which case the part needs replacing.
That order isn’t arbitrary: ruling out the button and measuring voltage before touching the strike avoids the most common mistake, which is replacing an electric strike that was actually fine.
Could it be the wiring instead of the strike?
Yes, and it’s more common than it sounds, especially in older installs. Besides the fatigue point near the hinges, moisture is the other classic cause: a splice exposed to the weather at the street door frame can corrode and gradually lose continuity, so the fault sometimes starts intermittent — it opens sometimes, not others — before becoming total, which throws off the diagnosis if you’re not specifically looking for it.
If the voltage that arrives is low rather than absent, replacing that run with thicker-gauge wire or improving the connections (soldering instead of just twisting the wires) usually fixes it without touching the strike at all.
How much does it cost to fix?
The release circuit is quoted the same way as any other intercom repair: labor on one side, parts on the other. A peso figure from this year is stale within months, so it’s more useful to think of it in units of technician time: based on the Genz Clima and Home Solution surveys of intercom labor (the same reference as my intercom isn’t working), this repair runs roughly half a day to a full day of technician labor, depending on whether the button and wiring are enough or the strike itself needs replacing. On top of that labor comes the cost of a new strike if replacement is needed, and after-hours or emergency call-outs typically add 20–50% — always ask for a current quote.
One practical warning: don’t confuse this repair with replacing a regular door lock or a keypad-based smart lock — those are quoted separately and cost noticeably more, because they’re a different product. Ask specifically for an “intercom door strike” or “electric intercom lock” quote so you don’t overpay for the wrong part.
When does it make sense to replace the strike instead of repairing it?
If the fault is in the button or the wiring, fixing that section is enough and it’s cheap. If the fault is in the strike itself and it’s already been cleaned and lubricated without result, that’s when it’s worth looking at the full option before paying for a second technician visit on the same problem.
One important distinction: a retrofit that just connects on top of the existing installation inherits that same release circuit, so if it’s mechanically dead or the wiring is cut, it still won’t open even after you modernize the communication. What does stay protected in that scenario is the communication itself: DoorLink’s relay is fail-safe, so if it loses power or connectivity it falls back to passthrough mode and the building’s old indoor handset keeps working as if DoorLink weren’t there. But when the intercom is already destroyed, stolen, or simply doesn’t exist, DoorLink doesn’t just add electronics on top of the old setup — it installs the complete system with its own street panel, door strike included. In that case the problem stops existing altogether, because the release circuit becomes new DoorLink hardware, controlled from the app — you no longer depend on the old strike, or on someone standing at the button. It’s the same one-time cost, hardware-included installation as any other DoorLink setup, with no extra charge for coming from a destroyed system.
If the strike is just one of several faults repeating across the building — the button today, a handset last month, a splice before that — this isn’t a narrow fault anymore, it’s the whole installation accumulating patches, and the underlying problem is bigger than this one circuit. Replace or modernize the intercom has the full comparison between a one-off repair, a retrofit, and replacing the whole system, and the calculator gives you a cost estimate for your building in under a minute, retrofit or complete install.
In short
Rings but won’t open means the communication works and the fault is isolated to the release circuit: button, wiring for that run, power supply, or strike, in that checking order. If it’s a narrow fault, it’s almost always a cheaper, contained repair than the rest of the intercom system. If the strike is past saving and the intercom is done for good, a complete DoorLink installation replaces that circuit with new hardware controlled from the app — so instead of repairing it again, you open the door straight from your phone.